Monday, September 30, 2013

Operation Project $0: Day 21 COATS COATS COATS!!!!

OK, maybe that should only be two 'COATS' since I have only managed to sew up 2 this month.  But I sewed up TWO coats this month - boooYAW!  And both of these beauties fit into my month-long sewing for as close to $0 as possible - a little endeavor I've named Operation Project $0.


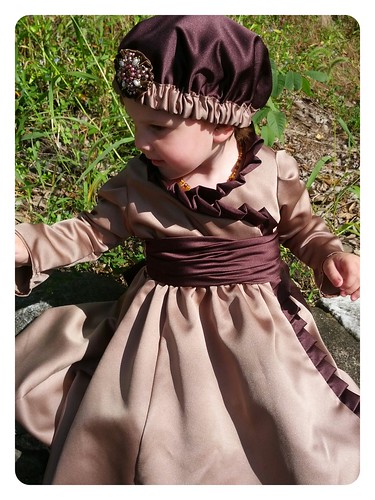
The first is the newly released Elenora Tea Coat PDF Pattern by Amelie&Henri.  I think this coat is adorable!!!  I was able to test this pattern which means FREE pattern - check.  The brick red outer fabric is an old sheet that my husband somehow managed to wear a hole through with his feet. (Seriously, who does that????  A huge hole in an Egyptian cotton sheet caused only by his toes?!?!?  Whatever, it resulted in this coat - so he is forgiven ;op)  The lining and sash are from leftover fabric from a quilt I started over 5 years ago.  I am NOT a quilter... I love clothing because I can see immediate results... quilting takes FOREVER.  My least favorite part about sewing is cutting - and quilting is ALL about cutting.  So I spent weeks designing a quilt, cutting all the itty bitty triangles and squares and sewing some of the mid sized triangles together and then put it all in a show box - and there is will probably remain until the end of time.
Back to the adorable-ness that is the Elenora Tea Coat - Soooo cute, zero smackers- done and done!

Anyway - this coat is perfect for fall... the bodice is lined so your little one will get some added warmth for the crisp fall days that are upon us.  The little button details and the sash add great style.  You could easily pair this with a leather or skinny belt for a different look.  No matter what -  you'll have a mini fashionista on your hands ;o)
This is my favorite shot!!!!


Into The Woods.... (I know, I know, I just can't help myself ;op)


The second coat is the Bova Coat by Apple and Fig. (You can read my pattern review HERE)

This one is for B, who needs much more of a wardrobe this year than A.  He has always been bigger - but this summer he shot up a couple inches and has kept his broad shoulders and muscular frame, placing him solidly in the 3-4 size range - except not for pants.... He just can't wear store bought pants anymore unless they are stretchy.  He needs a 3 for height, but he is only 2 and still in a diaper, and has a bubble butt - 3's are made for potty trained Boys who have slimmed down or are just built like bean polls.  Good thing mama can sew for him!  You'll get a gimps of his rocking jeans that I made him in these photos - but I'll tell you all about them later on (yeah, they are $0 too).
The outer layer of my Bova is a blue wool that my sister sent me last year when I started this whole idea.  It is left over from her diaper/soaker making days and I was ecstatic when it showed up on my door step out of the blue.  The lining is actually left over fabric from the curtain panels my mom used to make the boys fitted sheets for their nursery when they were first born.  $0 amazing Fall coat for my little man - YES PLEASE!!!!


*Oh and my husband gave me the best compliment on this one...
Hubs:  'these clothes you are making look like they came out of a period movie set...'
Me: 'ummmmm, ok?'
Hubs: 'No, they are really cool... not like the Elmo stuff you can get at Target... you can't find the things you are making in stores here.'
Me:  (melted pool of adoration)

We don't have a whole lot of options for shopping here in PA, and while I know I could find things on-line, the price tags and our budget don't coincide.  I'm one of those moms who just doesn't like the 'character' stuff... and I know one day soon their begging will veto my style... but until then, I get to have fun ;o)

Keep adding those images to the Flickr Group - I'll do a round up on Wednesday!!!!

Friday, September 27, 2013

Operation Project $0: Day 20 with Frances Suzanne

Well today is out last day of Guest posters for Operation Project $0 - but never fear, I'll be doing round ups and sharing some more of my own creations next week!!!  So don't run away, come back.  And make sure to upload your own $0 inspired looks to the Flickr Group so that I can feature you and your work next week!
Today I have get to have a big smile on my face as I introduce to you Ashley and Emily of FrancesSuzanne.  I just love these girls.  I love their sewing ability and their attention to detail,  and that fact that they spend all this time sewing for their sweet nieces... it just makes my heart smile.  I was lucky enough to meet this dynamic duo through sewing along with Project Run and Play - these are girls who sew inspirational pieces and somehow humbly (and honestly) never turn to pride or boasting about how awesomely amazing they are.  I knew when I asked them to join in that they were not upcyclers... I also knew that they are pretty strict rule followers... and I was so happy when they signed up for the last day, because I KNEW they would close us out with a great outfit sewn for exactly $0.   So take it away Ashley and Emily.... I'm so happy you are here!

----------------------------------
Hi everyone!! We are Ashley {frances} and Emily {suzanne}, and we blog over at Frances Suzanne about the clothes we make for our nieces. When Suzanne asked us to be a part of Operation: Project $0, we were excited....but scared....
 Could we sew an outfit for ZERO DOLLARS?? 
That was the challenge, if we so chose to accept it....
Was it possible?? Absolutely!
But, the probability of achieving it wasn't in our favor on this one....
Our track record doesn't bode well for being the most frugal / inventive with materials we have on hand. Still, we'd like to think we are improving in this area of our sewing, and definitely see the benefits for doing so. So, let's get down to it....did we or did we not succeed in sewing a garment for a whopping $0??
Starting with the patterns used:  See Kate Sew, Kaleidoscope TopSURPRISE!! That's what we found waiting in our inbox one afternoon. Kate, of See Kate Sew, had gifted her Ruffle 2013 Guest Post friends with a complimentary pattern {the Kaleidoscope Top} for contributing to her series. What an honor to participate, as well as an awesome surprise to follow. 
COST= $0
Oliver and S, Playtime LeggingsWe had the opportunity to sew and blog about this pattern a few weeks ago, to kickoff the Fall Pattern Release of Oliver and S. It was our first time to sew with knits, and obviously it wasn't too, too scary....because here we go again!
COST = $0
Then, onto the fabrics of choice: See Kate Sew, Kaleidoscope Top: Sally, of Daisy Chain Creations, gifted Ashley some knits a while back - as a "thank you" for helping in a graphic design project she was working on. PERFECT!! Couldn't have chosen a more perfect print ourselves....
COST = $0
Oliver and S, Playtime LeggingsTime to raid the closets on this one.....and found just what we were looking for in dear ole' dad's closet: a navy t-shirt given to him by a vendor years ago. Perfect size, perfect style. And, as an added bonus, we were able to keep the shirt hemline as the leggings hemline. SCORE!
COST = $0
Shockingly....we DID succeed in the challenge, and would gladly accept a similar challenge in the future. WHOOP, WHOOP!! Let's hear it for an outfit that cost us ZERO DOLLARS!!!
This challenge definitely pushed us to look at what we had available {and there were several options when you just look}, and use resources {ie: patterns AND fabric} on hand to complete it without heading to the fabric store in the middle of a project.
So, thank you Suzanne {and Operation: Project $0 "company"}! You gave us just the push needed to sew a practical, fun outfit for a very active niece...
And, if you happened to miss the other frugal bloggers in this series, 
check them out and be inspired!!  There's some pretty fantastic creations showcased....

Thursday, September 26, 2013

Operation Project $0: Day 19 with Max California

Can you believe we have been going strong with Operation Project $0 for 19 days now!?!?!?  I am so impressed by the amazing creations everyone has been coming up with - it is so encouraging to be reminded of how many different garments, how many different styles, and how many people CAN be a part of this idea.  Thank you for being apart of it!!!
Today I am sharing a pattern modification to create Pirate Shirts over at Pattern Revolution.  I of course had to make these $0 costumes for my own bemusement, so they are made from a queen sized sheet (with plenty left over for baby girl to get one too)... and those cool 'pirat-y' accessories - they are all belts of my mom's that she gave me to use for the hardware.  I'll take $0 costumes any day.  Check out the post to see all the adorable pictures ;o)


Now on to the really good stuff.... I have perhaps my favorite blogger in the world with us today ;o)  I would like to introduce you to Max of Max California (yes, I know her real name is Ari - but to me she is and will always be Max).  I started following the Max California blog very early in my discovery of sewing blog.  There was just something about this rocker Australian with an edgy style and so much creativity that hooked me.  We quickly hit it off and vowed to one day compete together on Project Run &Play... little did we know we would accomplish that feat AND both make it to the final three.  She is the most supportive person you can image, she constantly makes me laugh, and virtually anything she makes for her blog makes me want to be more creative, more innovative, and more adventurous in my own sewing.
Without further blubbering and ado.... here is Max!
------------------------

Hello Winter Wonderers, Wanderers & Whatnots! I'm a massive fan of recycling clothing and fabrics and giving them new life. Today I'm going to show you a dress I made Edison for pretty much $0!
I'd seen these cute dresses for kids with double collars popping up every now and then, and I knew I wanted to give it a go for Edison. Using a basic bodice pattern I drafted myself in her size (pretty much every little dress pattern is base on a basic bodice pattern, but I found a great free one here you can use from Climbing the Willow), I slashed it across the middle of the armholes. The bodice of the dress is made in white cotton drill from my scrap bin, and the skirt part of the dress is made from blue silk with white polka dots on it. The silk I bought from the second hand shop for about $4 for around 2-3m of it.
I bound the armholes in white bias binding, also in my stash, and instead of hemming it I just serged the bottom of the skirt. I was in two minds about whether I should hem it or use white bias binding around the bottom, so it remains slightly wearably unfinished! What do you think I should do?
The back has a blue invisible zipper that I just sewed in like a regular zip. I have a shoebox full of zips that I have had for literally over 10 years, but really needs replenishing. I'm loathe to buy new zippers so I keep scouring the second hand stores for zips, but I also have thought about buying a bulk lot of eBay. I had issues with the zip, and so I added a hook and eye at the top to keep it closed. After a bit of fiddling I fixed the zip and the hook & eye isn't necessary anymore!
 I drafted a peter pan-like collar for the front of the bodice, I'm really into front-only-collars lately it seems! The collar was in one piece, instead of two, as I wanted it to have like a bow effect. Then I drafted a slightly smaller collar and made them both up with the silk for the outer pieces and white drill for the under pieces. I added a small tube of the silk over the front of the collar and then made two 'ties' and basted them underneath the collar before sewing it all together! It sounds confusing I know, and I have full intentions of writing a tutorial for this dress when I get some time!
It's a bit too hot here in Australia to be wearing silk dresses, so we will wait for a nice cool day to bust this dress out again! It's getting shorter as she gets taller, but I love that it can be worn as a little tunic over leggings or jeans (provided she doesn't get too much wider).
You can check out some of my other $0 projects over on my blog, such as the kids superhero Fancy Pants Leggings, Eddie's Green Lantern popover tunic, her Dreaming of Spring blazer, her Retro Red Romper, Vincent's Alpine Adventure Hoodie, Eddie's rainbow dress (omg she was so little!), Vincent's Freddy (Kreuger) Shirt, and Edison's Chromium Tunic. That's only a tiny little drip in the pond of projects I have made spending $0 or using recycled clothing/fabric! I hope Suzanne's series has inspired you to use what you have, or see new potential in things you might normally just throw away! It's not just about saving money, but being a little sustainable too! (for me it is anyway ^_^ ) PS. If you think this dress looks familiar, you're right. I used the same fabrics to make Edison's Ahoy! Sailor Dress a few weeks ago :)

Wednesday, September 25, 2013

Operation Project $0: Day 18 with Jo of the Shaffer Sisters

Well it is the middle of the week - and drawing close to the end of the month... and our series... SAY IT ISN"T SO!!!  But, I wanted to share a few of the sew along entries that jumped out at me from our Flickr Group.  Don't worry - you can still submit your $0 inspired creations to the Flickr Group and be featured in my round ups next week.  I absolutely love seeing what everyone is sewing!!!
How great are these Knight Tunics (upcycled from pants) by Vera Luna
This stunning Dress is made from an old Bridesmaid Dress by Lippy Anne Designs
Kit Kat inspired Shirt made from a women's T and a baby romper - awesome job Beth!
Now on to today's Guest poster - this series would NOT be complete without the Third sister, Jo, from the Shaffer Sisters.  I was so happy when they let me know that each sister wanted to get in on the action - I feel so loved, and blessed to count them in my blogging community of friends!  I am loving this dress that Jo came up with... and is there a little announcement in there about patterns to be on the lookout for from this fabulous trio?!?!?  I can't wait to see all the wonderful things they have in store!!!
Take it away Jo.......
------------------------------

Wow, thanks so much for letting us come visit Suzanne.  The month has flown by, and it
has been full of terrific money saving ideas and inspiring project.   It has been really fun for us to participate!

A while back, Scary and Al went through Momma Shaffers fabric and trimmed it down for her.  Then, we all got together in Oregon for a sisters reunion, where Scary divided it out.  Before the trip, Scary was telling me how she was weeding out the good stuff, and sending the rest to the thriftstore.  I told her to quit weeding and bring it all!  So, Scary brought 3 giant black garbage bags full of fabric to me when she came.  I was exstatic.  I am not a great deal finder at the fabric store.   I am not good at waiting for the sales.  So, having a giant hoard of fabric on hand works great for me!  
Scary doesn't really love plaid, so she sent all of Momma Shaffers plaid to me.  Perfect I could use it for all the members of my family.  When Plaid week came up in Project Run and Play, I knew I would be the one sewing for it.   So I googled plaid dress images.  
I found a cute Circle Skirted Dress with long sleeves.   So I used it for my inspiration.
I wanted a yoke neck, with buttons.
I wanted a hi-lo circle skirt.
I wanted long baseball sleeves.  
For more pictures, my original post is here.

I will be honest, I did purchase the notions.  I never have those "laying around"  So, in the end I had to make a trip to the store for the bias tape and the buttons.  But the fabric and self created "pattern" were mine.  

We will be testing this pattern in the future, and then it will be on our etsy shop.  Let us know if your interested in testing it.  
We love budget sewing.  You can find some of our other budget posts here, here, and here.
Thanks again for letting us create over here Suzanne!
with love,
-Jo

Tuesday, September 24, 2013

Operation Project $0: Day 17 with Alida Makes

Can you handle MORE Operation Project $0... 
well hold onto your seats,
 cause.... here.... we..... GO!!!
Do you have any people you consider blogging 'Rock Stars'???  Well I do, and her name is Alida of Alida Makes.  I don't know why she immediately became one of my pedestal icons - maybe it is her southern charm (and correct knowledge of exactly what 'well Bless her heart' means), her daughter's fantastic sense of individuality and style, or the fact that her selfies are GORGEOUS.... or maybe it is just her passion for the best accessory in the world - the FEDORA!
For whatever reason I just get the biggest kick out of reading her blog, I get sloppy smiles when she leaves comments on my posts, and I am tickled pink that she said YES to joining in this series.
Now take it away Alida!!!
--------------------------

Hey y'all!  Thank you so much for having me here today.  I have a confession: my fabric budget isn't what it used to be.  I have mostly gone through my thrifted items and started shopping in my own closet!  


The solid green fabric on the hoodie used to be one of my dresses.  It had very pretty fabric but the fit was not flattering.  It was one of those pieces I knew I was never going to wear again as soon as I saw photos of myself in it.  Exhibit A:


Just didn't hit me right.

ANYWAY...because I used an existing garment I didn't have enough fabric for the sleeves or the inside of the hood, so I used some sweater knit leftover from this project.  The pieces were so small I almost threw them away, now I'm so glad I didn't!


The pants were also a dress, believe it or not!  This dress I've had since my size 4 days, and let's just say that *if* I ever wear that size again I think I will probably be able to live without this dress.  It looks so much better as harem pants!


These pants are self drafted, but there is a really great pattern by Feathers Flights HERE.


The hoodie is the Bimaa Hoodie by LouBee Clothing.  I love how this outfit came out!  It wouldn't be as special if I'd had yardage to use on it.  Sometimes making clothes out of existing garments can be frustrating, but it often leads to design genius!

Thanks for having me y'all!  Come visit me over at Alida Makes for fun toddler style posts and lots of DIY kids clothes!
---------------------
Thanks for being here Alida - I kinda just feel like I shook hands with a Rock Star! ;o)

I'll be featuring some of your creations tomorrow, so make sure you link them up to the Flickr Group so that we can all see the amazing things you have created!


Monday, September 23, 2013

Operation Project $0: Day 16 with Hayley of Welcome to the Mouse House

Hello MONDAY!!!  And welcome back to week four of Operation Project $0... it seriously just keeps getting better and BETTER!!!  I hope you aren't bored yet, because we aren't anywhere close to done ;o)  This week is going to be chalk full of all sorts of cool stuff... I have an amazing lineup of guest bloggers, a slew of awesome things I have sewn up for my bruiser of a boy, and later in the week I will be sharing a round up of some of the awesome things YOU have all been submitting to the Flickr Group - if you haven't added something - GO, DO IT!!!  You might just get featured ;o)
But today I get to have my girl Hayley  of Welcome to the Mouse House share her awesome-ness with you.  If you had told me 6 months ago that I would have Hayley posting on my blog, I would have laughed at you.  If you had told me that not only would she be posting on my blog but that I could consider her a true, honest to goodness FRIEND.... I would have said she didn't know I existed.  But, today I introduce my friend Hayley - a girl who can drink boxed wine with the best of them, create the most amazing designs while wrangling raising 2 adorable children, has the best heart (READ THIS!!!), and will always have your back.  And, she is also the blogging version of Kevin Bacon - the girl is somehow connected to EVERYONE!!!
Give it up for Hayley, Woot WOot!
--------------------------

Hey guys!  My name is Hayley and I blog over at Welcome to the Mouse House.   When Suzanne asked me to be a part of Project $0, I was so excited.   I absolutely love to recycle clothing and make them new again.  Thanks for having me!


Way, way back in the day, I used to be a teacher with a great wardrobe.   I still have several clothing items from my working days that are cute, but just not something I would wear now, so they are piled in a bin just waiting to be upcycled.   For Ainsley's newest outfit, I took one of my old sweaters and pants.

I cut apart the sweater and created an A-line tunic dress with long sleeves.  I cut out the a-line dress, removed the cuffs and hem and reattached once I had the proper size, and then gathered the top neckline before adding a bow.  


I used extra sweater fabric to make the bow and "tied" it with the pants fabric.  Hand stitching attaches it to the sweater.  

My favorite part has to be the elbow pads created from the pants fabric.  They make me smile.

Ainsley's leggings are created from the reverse side of my pants.  It might be the "wrong side" but how great that can be!  Make sure your pants have a good stretch… it won't work otherwise.  If yours don't stretch like mine, you could create trousers, instead.

I drafted some leggings/jeggings and added a cute buttons to each leg.   Her shoes were ones we already owned… 
she calls them "Fabulous"


Not only do I love that it was free, but I love that it is so comfortable and wearable.   


Sweaters are the perfect items to create new outfits.   They could be transformed into dresses, tunics, t shirts, etc.


Perfect for playing.


Thanks so much for having me!
--------------------------
Thanks so much for being here!  And the outfit is FABULOUS!
Make sure to come back tomorrow... and you can catch up on all the fun we've been having this month HERE!