-----------------------------------------------------------------------
Bow Bow Bow, Merry Christmas!!!
I'm Suzanne from Winter Wonderings..., and I am so excited to be sharing this tutorial and pattern with you all today.
(pattern to make these felt bows further down)
Not only do I have my baby girl, I also have 2 nieces that are in the baby-toddler range. Some baby girls are blessed with tons of hair (I am so happy mine has as much as she does), but some babies don't get their hair until later. I knew I wanted to make hair accessories for all three girls - things that could be work with different outfits and compliment any time of the year, so I knew I needed versatility!
I fell in love with these bows on pinterest and knew that I wanted to attach them to baby clips for the littles. But what if my nieces don't really have enough hair for clipping yet??? What to do, what to do?
So, I came up with an ingenious (to me at least) way to create bows they can grow with.
My idea was to create a system of bows and elastic headbands that work together. Elastic headbands are amazing for babies, but eventually babies heads grow and all their pretty elastic headband bows go out the window... or not. Attaching clips to the back of bows allows them to be worn on anyone with hair (don't judge me if you catch me out and about with a cute bow)... but clips aren't easy to just pop on an elastic band because they go the wrong direction once clipped on.
By attaching a loop of felt to the elastic band, I have created a place for bows to clip on in the right direction. Now all of these bows can be used on baby now and then as clips for years to come!
Let's make one!!!
(I will be hand stitching, but you can use glue)
You will need:
Felt
Sharp scissors
Ribbon
Elastic Headband
Needle and Thread (or glue gun)
First: Cut a strip of felt 1.5 inches long and 1/2 an inch wide
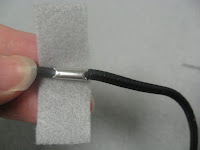
Second: Wrap your felt strip around your elastic headband by folding it in approximate thirds. By attaching it where the metal bracket is, you will protect your baby's head from any metal touching their skin.
Third: Stitch the overlapping layers together (or glue the overlapping layers together)
Fourth: Now stitch the bottom of your felt loop (side stitched/glued together) to the elastic so that it will stay in place. Making sure that the top remains an open loop for your clip to slide into.
Voila - a headband with a felt loop attached - yeah, now you need BOWS!!!!
I'm sure I am not the only one to be severly disappointed that there was no template for these gorgeous Japanese felt bows. Disappointing no more, here is a pattern for you to make your own! (you could free hand it, but it took me quite a few attempts to get the dimensions close to the originals.)
*I recommend cutting the pattern out of thin cardboard or cardstock
-Cut out your three pieces (if you want matching sets, double over your felt and cut two of each piece at once so that they will match each other fairly well.)
Tip: Fold the outer points of piece #1 toward the center facing you. Hold edges in place and put piece #2 behind and stitch the two together (the raw points of piece 1 are still visible facing you at this point). Then wrap piece #3 around the center and stitch in the back. This will give you that great bow look!
Want a ribbon bow too????
No problem!
-Cut two lengths of ribbon 4 inches long. And one 1inch long.
-Sew one into a loop
-Fold the other length in half (to 2 inches) then fold up in half.
-Cut a diagonal along the open/non folded edge
- Now sew the raw edges of your 1inch long section together.
-You will now have three pieces that look like this:
-Place the large loop on top of the clipped 4 inch section and then wrap the small tube(formerly 1 inch section) around the center and stitch in the back. Voila - pretty bow.
Finally, attach small clips to the back of all your bows (I used super glue here, but you could stitch them on)
(these were cheap clips I found at the $1 store)
Whew! Headbands, bows, clips; oh my!
Now put it all together, and enjoy on your little girls for years to come!
I think Baby Girl is happy with her bow clip!!!


Love these!!!!
ReplyDeleteDarling! thanks for the tutorial!
ReplyDeleteShe is getting so much hair. What a simple sweet bow to match the stage.
ReplyDelete