And of course you always want to get some kind of gift for the baby. I love it if I can get something off the registry (they registered for it, obviously they need it!). But when possible, I also love to get or make something personal and special. I stumbled across the following softie on pinterest.
 |
| from: Sparkle Power/ (CandaceTodd.Blogspot.com)http://candacetodd.blogspot.com/2010/12/soft-baby-rattles.html |
Soooooooooooooooo stinkin cute - especially for my little niece whose nursery is an orange and grey giraffe theme-, but sadly there is no tutorial because she had the pattern in a book. Hmmmm - well it looks simple enough - so I free handed a pattern, skipped the rattle element, stuffed it up, and had an adorable little giraffe to give my niece.
My Cousin and his wife are currently expecting their first child - a little girl - so my family decided to send them a shower in a box (aka: a box of gifts from all of us, since we don't live close enough to go to their shower). Their nursery is a nautical theme in blues and tans. What would be better than a cute little sea horse - and I knew I had the perfect fabric to do it in.
This time You are getting a TUTORIAL!!! (this is a simple enough project for anyone to try!!!)
-So the first thing that you need to do is figure out what animal you want to create - I of course am doing a Sea Horse, but you can use this tutorial to create any animal you want.
-Next, pick your fabric and find a template. You can free hand a template and draw it on paper, or take the easy route and print out an image. (*** Do a google search for coloring pages and you will be amazed by what great images you come up with that are free to download and print)
 |
| image found at: http://www.hellokids.com/c_21392/coloring-page/animal-coloring-pages/sea-coloring-pages/seahorse-coloring-pages/seahorse-online-coloring?print=1 |
-Cut out the template (following your sharpied lines) and lay it on your fabric
-Trace your template onto your fabric (add seam allowance) - make sure your fabric is folded over wrong side to wrong side so that you will cut two inverted images at once.
-Cut with your AMAZING Roto-cutter (wait, you DONT HAVE A ROTO CUTTER?????? - get your keys, run to the store, and buy one - seriously this is the one tool I can't live without, it will CHANGE YOUR LIFE!)
 |
| (see the seam allowance left around your template) |
-Now pick your embellishments: I like to make some sort of 'Tag' that baby can hold onto or chew on. For this project I decided to do dorsal fins and a coronet (did you know that means crown). I had 1.5 inch ribbon on hand, but you can use whatever strikes your fancy. Cut the ribbon to length (2 fins, 1 coronet)
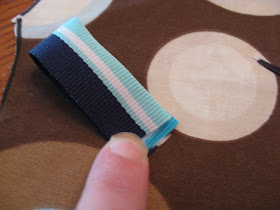
-I decided the ribbon was too wide for the fin, so I folded it in half and liked the look much better.
*Top stitch the edges of your ribbon (I did a zig zag to decrease fraying, you could also use fray check)
-Next, pleat or ruffle your coronet and top stitch so that it will stay put when you sew it into your softie. (there is no right or wrong on the pleating/ruffle, this is your embellishment - customize as you please)
 |
| (finished pleated coronet) |
 |
| (angled down toward stomach) |
 |
| (folded back up and top stitched 2x) |
- Stitch around, make sure to leave a 2 inch opening in the back so that you can turn it inside out and stuff it.
- Turn it right side out and admire the cuteness. Now stuff that baby - I used a pen to push the stuffing down into the tail. Stuff it nice and full!!!
-AWWWWWWWWWWWWWW over your creativeness, it is so much cuter stuffed. Now take a deep breath, we are almost DONE!
- Hand stitch up that opening in the back
-I like to bring my needle up from underneath...
... so that I can tuck in the tail and knot
-and finally, you are ALL DONE!!!
Now go out and spoil all those little ones in your life!
 |
| someone approves of my handiwork! |
Shared on: http://www.skiptomylou.org/2012/07/30/made-by-you-monday-112/,
http://makingtheworldcuter.com/2012/07/cuter-monday/ , http://diyshowoff.com/2012/07/29/diy-linky-party/, http://www.craft-o-maniac.com/2012/07/link-party-craftomaniac-monday.html, http://www.mommybydaycrafterbynight.com/2012/07/ta-da-tuesday-link-party-49.html, http://todayscreativeblog.net/summer-food/, http://www.hopestudios.blogspot.com/2012/07/tutorial-tuesday_31.html, http://thecreativeitchboutique.blogspot.com/2012/07/sew-cute-tuesday-73112.html, <center><a href="http://sewmuchado.blogspot.com/"><img border="0" src="http://i807.photobucket.com/albums/yy351/jdsmit21/SMAbuttonWDIWscissorsbordercopy.jpg" /></a></center>, http://sarahdawndesigns.blogspot.com/2012/07/pintastic-monday-link-party-2.html#.UBkIlZ1lSjY, http://alderberryhill.blogspot.ca/2012/07/make-scene-monday-33.html, <center><a href="http://733blog.blogspot.com/"><img border="0" src="https://blogger.googleusercontent.com/img/b/R29vZ2xl/AVvXsEjHNTspE5gVibVJaAwaZGae-OJT-LO_H5jvC8BrT8d87b7tH8a1oHHE0m-noJZyR-ElicYKcN9z5HXnxYckGGJdKX3autadYynDK-I3zv9UcsaPiU20kP1NADNShfb05KSCiIzKGcsXSdk/s320/SugarSpice.png" /></a></center>, http://somedaycrafts.blogspot.com/2012/08/whatever-goes-wednesday-128-plus-chance.html, http://www.the36thavenue.com/2012/08/best-diy-projects-and-link-party-67.html, http://thecsiproject.com/2012/08/22/time-to-link-up-for-the-pinterest-inspired-challenge/


How cute! I have a few sister-in-laws that are pregnant and this would be an adorable gift! Thanks for sharing :) Can't wait to see more!
ReplyDeleteOhhh - if you make some, you will have to show me how they turn out. I swear they are super easy!!! Thanks for stopping by, hope you come back often ;o)
DeleteSo cute!
ReplyDeleteThanks for having a look, this is my first time doing the 'linky parties' and it is fun to see a few new people seeing what I've worked on this week ;o)
DeleteSo stinkin cute! You are awesome girl! My favorite part of the tutorial was the smiles at the end. :)
ReplyDeleteI know, her smiles kill me - she is just so happy and giggly, I love her so much!
DeleteThey are all super duper cute:)
ReplyDelete