Friday, September 20, 2013

Operation Project $0: Day 15 With the Shaffer Sisters

Today is the close of week three of Operation Project $0.  I hope you are being encouraged that sewing doesn't have to be expensive and that there are so many ways to rework what you might already have!
Today I have Al of the Shaffer Sisters with us.  She is incredibly talented and has two adorable kiddos.  The fact that we both sew for boys and girls and they we both have tall children makes me always want to check out her posts!
Give a huge welcoming hug to Al....
-------------------

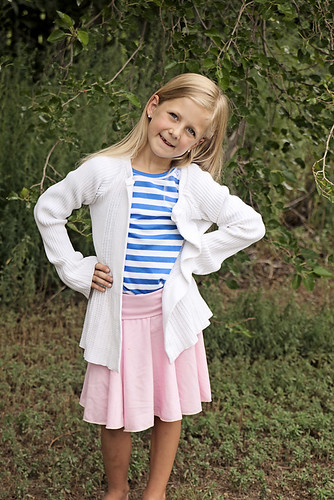
$0.25 Nautical Style Skirts
Hey, Winter Wonderings, Wanderings, & Whatnot readers. It is such a joy and an honor to be here sharing on Operation Zero. With my husband still in school and two young kids always around my feet, pretty much every project has to be a free one. It seems like a majority of Suzanne's posts involve up-cycling and the first time I read her blog was when she competed on PR&P. I was new to the blogging world and PR&P. Her great looks often came from up-cycled clothing or leftovers from another project. So I admired her creative talents from afar and now I'm lucky to be over here.
This project was made from the remnants of a sheet in which Scary and I made sailor suits for our sons. We started out making these in celebration of my Grandpa's life and his loving service in the navy, but we had barely just enough to get two little girl skirts as well. They were quick and easy.
The directions for the 18 month and 3T skirt are about the same, with one more step for the 3T. If you would rather double roll your hem instead of using the rolled hem setting you should add another 3/4" to your height. We had to get creative to put these skirts together having very little fabric.
For the 18 month size skirt I cut two pieces of fabric 9" (H) X 13.5" (W).
For the 3/4T size skirt I cut two pieces of fabric 9" (H) X 16" (W). If I would've had more than 9" for the height I would've used it, but this was all we could get out of the sheet. Because I knew it wasn't long enough, I had to take the extra step to make it long enough by adding a ruffle with some scraps I had.
To make the body of the skirt, follow these instructions for both sizes. Note if you don't have a serger see instructions at bottom. To put the skirt together, you will need to start with putting right sides together and sewing along the side seam (along the 9" height) with 5/8" seam allowance. I followed up this stitch with a serge.  Then I did a rolled hem around the bottom (the length of the 2 widths put together) and a serge at the top to finish the edge without losing much in the length. After the top and bottom had a finish to them, I stitched the remaining side seam (right sides together again) starting at the bottom of the skirt and sewing up to the top of it. After I sewed the side seam I went back with a serge to eliminate any bulk and finish the last side. I sew before serging because if something doesn't quite match up I'm not stuck and I can always seam rip and stitch again. If you don't have a serger, you can always use a french seam on your side seams. To put in the hem (this would come after both side seams) you would press the fabric 1/4" to the wrong side and then roll up another 1/2". Then top stitch the hem at 3/8" so it stays.
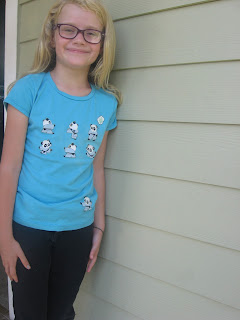
At this point I added my embroidery to my skirts. I did this using the images cut from freezer paper that I ironed on at the desired location. Using tailors chalk I lightly colored over the paper so it left the silhouette of my desired shape (a ship's wheel for the 3T and an anchor for the 18 month).
The anchor was attached using a satin stitch (my first go at it), and it was super simple with a quick strong look. I searched it on YouTube just before stitching it to learn how to do it. Yep, I learn lots of fun things about sewing (hand embroidery, sewing techniques, presser feet for my machine, felting, etc.) on YouTube.
To put the boat's wheel on the  3T skirt I used a chain stitch (also looked it up on YouTube back when I chain stitched the bodice on Ty's Concentric Circle Dress) because it would've been harder to use the satin stitch in this situation. By the time, I had completed all my embroidery, the tailors chalk had worn off. If it would've still been around then I would've hand washed it. Following the hand embroidery I cut two black pieces of interfacing just bigger than the completed images (leftover from the boys' sailor suits) and ironed them onto the back of the fabric to project the stitching. Both images were made using one package of embroidery floss that cost a total of $0.25.
The 3T skirt was finished with a ruffle to help us get the desired length. I got the white fabric from scraps leftover from a previous project. To make this I cut a long strip 4.5" (H) X 36" (W). Then I put right sides together and sewed along the height (a 4.5" stitch) After folding this in half with wrong sides together I put it in my serger and adjusted the settings so that it would finish the edge and also put a little gather in it. Once it was the same circumference as the skirt I put them together. Since I already had a finished edge on the body of the skirt, I set the ruffle just under the base of the skirt and top stitched it in place. It left me just over a 2 inch ruffle.
Then to put the waistband on both skirts I used Navy blue elastic from another project. I cut each piece an inch smaller than the girl's waistline. Overlapping the elastic a little bit, I used a decorative zigzag stitch to make it into a belt. Then I pinned the elastic belt on to the top of the skirt (elastic on top) evenly all the way around. And attached the elastic on with a zigzag. I did this so that the stitch would not limit the stretch of the elastic. When I finished this step I was done.
I hope that everyone who reads this series gets the take home message that sewing doesn't have to be an expensive hobby. You can get bold on a budget. You're kids (or yourself) can look like fashionistas instead of someone that has a $20 clothes budget a year. If anything it can be a money saver if you look for fabric in the right places (clothing exchanges, flat sheets, clothes that you no longer like and could be up-cycled for your child, clearance rack dresses that contain yards of knit fabric, fabric lover friends who have more than they could use in a life time and would love to share with a fellow seamstress, yard sale discoveries, thrift store jewels: vintage patterns, fabric, thread, buttons, etc). It's funny what happens when you stop seeing things as what they are, but potentials for fabric. There's a quote I love from Dr. Suess' 'One Fish, Two Fish, Red Fish, Blue Fish,' "If you never did, you should. These things are fun and fun is good."

Look for these good things in life. I promise you will find joy.

With Love,
Al
------------------------
Thank you so much for being here today!  I love these skirts - and the Dr. Suess quote is awesome.  We should all keep trying new things and looking at things in a new way.  Finding fabric in new places keeps it fun and unexpected!

If you have been inspired to sew up something for $0 or close to $0, make sure to link it up in the Flickr Group so that I can feature you next week!

Thursday, September 19, 2013

Operation Project $0: Day 14 with Sewing Mama RaeAnna

Welcome back friends, today on Operation Project: $0 I am so happy to introduce my friend RaeAnna of Sewing Mama RaeAnna.  She writes a fabulous blog with plenty of sewing tutorials and ideas to keep you busy reading for quite a while.  She is also a budding pattern designer with two amazing FREE designs, and an absolutely stunning Dress PDF Pattern - The Bumblebee Dress.  It has two views, sleeve options, ruffles, etc....I really really love it, and if you don't already own it, you really should!
Beyond being so talented, RaeAnna is genuinely down to earth and sweet.  She is the type that I know I could have conversations with as if we had been friends forever.
Enough of me gabbing - here is RaeAnna with her $0 inspired wear....
------------------------------------


Hello WW&W readers!!! I'm so glad that Suzanne has put together a series on projects and inspirations that cost $0!!!!

Most of what I have done for my kids this year has been $0!  I have so much fabric in my stash that there have been at least 3 occasions this month that I've been in an online fabric store with several yards in my cart and I end up completely closing the browser and going to bed because I know I DON'T need any more fabric!!! haha!

I've decided to show you three projects that can hopefully inspire you to find things around your house or stash before you use any of your money!!!

1 - T-shirt Upcycle
 

One of my favorites and easiest ways to make clothes for my kids is to cut into old t-shirts and make something new!!!  This adorable raglan is made from two old maternity shirts!!!  You can see my post about it here!


2 - Fat Quarter PJ Shirt
 

I call this my "Scrubby Jams Top" and it is a FREE PATTERN in my shop! (Click here)
The fabric I used for this particular shirt in the picture was also free!  I won 3rd place in the Sew Off competition and Riley Blake sent me a free fat quarter bundle!  I think it is fun to use different coordinating prints to make this cute shirt! 


3.  Boutique Ruffle Dress (Bumblebee)
 

The fabric was *almost* free for this adorable dress!  I went to Huntsville to meet some sewing friends and the Martha Pullen School had cotton fabric for $2.50 a yard!!!  I also was able to buy Oliver + S patterns for $2 each!!! Yay for sales!

This dress has been a fun labor of love since October last year!  I named the dress the "Bumblebee Dress" because the first version was made with some adorable yellow and black fabric!  I was inspired by some boutique dresses but came up with my own spin on the pattern - read about it here!

If you want to create this same look for your little girl I have a free tutorial here!


Thanks again for having me in your series Suzanne!!!!  I'm going to keep working away at sewing through my stash and practicing self control when I see all the wonderful new fabric lines being released by designers!!!!  In fact, I'm challenging myself to sew along with the Project Run & Play blog and was able to find everything in my stash for my first several looks!  Come check out my blog and follow along with me!

Sewing Mama RaeAnna Blog

------------------------
Thank you so much for being here RaeAnna... you can all check out my Bumblebee Dress too!!!

If you have been inspired to create something for $0 (or close to $0), make sure to enter it in the Flickr Group so that I can feature it next week!!!

Wednesday, September 18, 2013

Welcome back to Operation Project $0!!!  Today I have Marigold of Hideous, Dreadful, Stinky here to share the awesome vest she made for her son.  I first stumbled upon her blog about a year ago from a link up party.  Her awesome name was enough to pique my interest, and then I quickly discovered the world of unique crafts and tutorials that abound.  I know every time there is a new post that it is going to blow my mind... here are just a couple...
Marigold has the most amazing quirky sense of humor, and talent coming out the wazooo, and I'll be honest - I never expected her to say YES to guest posting on my blog.... But here she is!!!!
-----------------------------

Hi there! I'm Marigold from a little blog on the other side of the Internet called Hideous! Dreadful! Stinky! I'm so happy to be invited here today for Operation: Project $0. I love making something new from something old, but, honestly, I don't do it often enough. I have a huge stash of old clothes with "someday I will do something with this" written all over them, and I'm so glad that Suzanne asked me to participate in this operation and gave me a little motivation!
For this project, I took an old pair of my jeans and a shirt of my husband's with a little mustard stain on it. And I turned it into...a supa fly lined denim vest!

upcycled kids' vest from jeans and dress shirt

It came together pretty quickly, and I love the totally 80's style! It looks great over a Donkey Kong tee. And it's actually a really practical item for our mild SoCal fall and winter, where a jacket is often too warm.

denim vest from old jeans

There are a few fun details that I'm pleased with. I like the way the jean's inseams added a nice detail to the button placket. I also took the coin pocket from the jeans and stitched it onto the chest. It's the perfect size!

denim vest from jeans

For the back, I had to stitch together a couple of pieces from the legs to make a piece of fabric large enough to fit my kindergartner. I like the striations in the denim moving at different angles. I also made a little tie in the back - although, I think I might like to change that to an adjustable buckle since he doesn't like the thick knot when he sits down. Overall, not bad for $0!

For more upcycled projects, check out my teepee made from men's shirts and my boy's tie from a man's tie!
--------------------
Thank you so much for being Here today Marigold!!!!  I love this little vest so much, and your son is so handsome.

If you have been inspired to create something for $0 (or close to $0), make sure to enter it in the Flickr Group so that I can feature it next week!!!

Tuesday, September 17, 2013

Operation Project $0: Day 12 with Stitched by Crystal

Good morning Operation Project $0 readers!!!!  Today I have Crystal of Stitched by Crystal here to share with you all.  Crystal and I met through the PDF  Pattern Sales and Promotion Group on Facebook... we then were able to work together on Pattern Reviews for Pattern Revolution.  She is an excellent seamstress, has some awesome photography chops, her little girl is simply adorable (and close in age to baby girl), and all in all she is just the sweetest person!!!  I was so excited when she was willing to participate in this series... I'm sure it isn't the last time you'll see her here, or at least I hope not ;op
--------------------------------

Hi there! I am Crystal from Stitched by Crystal.  I am thrilled to be here for Operation Project $0, sharing the fall tunic I made for my little girl!
I always have a pile of old clothes in my sewing room that I plan to upcycle into clothes for my kids "someday".  Unfortunately I don't dip into that pile as much as I should.  Suzanne and her Operation Project $0 gave me just the push I needed to get to work on that pile.  It came a a perfect time too because my daughter really needs more long sleeves in her wardrobe for the fall.
I had bought this dress on the sale rack a few years ago but it was too big for me now so it has been sitting in my upcycle pile for months.  I love the fabric and I just adore blue on my daughter, so I got to work and made it into this little tunic.  I didn't have a long sleeve pattern for woven fabric, so sticking to the $0 challenge, I drafted a pattern for this using one of her brothers old shirts as a guide for sizing.  I added a ruffle detail around the yoke using the lining fabric from the dress and the elastic for the sleeves came from the straps on the dress.
I paired the tunic with some hand-me-down leggings from a friend and shoes she already owned.  There you have it, one outfit for fall, cost = $0!


------------------------
Crystal, I want a pattern for this - or a tutorial, or whatever.... just saying ;o)  Thank you for being here today and sharing this great project with us!

If you have been inspired to sew by Operation Project $0, make sure you link up your creations to the Flickr Group so that I can feature you!

Monday, September 16, 2013

Operation Project $0: Day 11... a Hodgepodge of fun

Welcome to the start of week three of Operation Project $0.. you can catch up on all the other posts bu scrolling down through them and clicking 'older' over and over and over, or you can go tot he original Post for this year HERE and find all the links at the bottom ;o)

Ok, so today I want to share some of what YOU have been making.  I absolutely love seeing other people's creations and what they are inspired to do with $0 (or close to $0)!!!

  • Spurofthemoment linked up this great sweater upcycle - I love making new sweaters out of old ones, especially when you get to keep the great knit details like original hems and cuffs!


Next...did you see my sweet little Wolfie sew along with Project Run and Play - well guess what ... it was an upcycle!!!   Yep, that gorgeous grey wool was from an old skirt, the white corduroy was leftovers from a project my mom did when my brother was in high school (umm we're talking over 10 years ago!).  The buttons were once again from my button jar... and the black bias tape - well I don't have any black cotton in my stash... so that is the selvage edge of some black eyelet (ok technically no longer 'bias' tape and the reason it doesn't lay quite perfectly, but hey - you work with what you've got!) You can see more pictures HERE.


And then there are my $1 pants.... gasp - I know... I SPENT MONEY ON FABRIC!  Yes, I know  it seems rather scandalous.  But I found this great stretch pinstripe jean fabric at Walmart this summer for $1 a yard... I couldn't leave it there.  I bought a few yards and am now wishing I had bought the whole bolt!!!  I used the free Small Fry Skinny Jeans pattern from Titchy Threads (size 2T only).  So, free pattern and a little less than a yard of fabric = $1 pants! *As much as I want to encourage people to use what they have or can re-purpose, I also want to show that sewing doesn't have to be expensive if you watch for those perfect steals!


Now this is the end of seeing GIRL things from me in this season (or at least until the end...).  This week I am sewing for my BOYS ONLY!  But, I wont have those projects to share with you until next week.  So, in the meantime keep coming back to show some love to the awesome guest posters we have lined up for the week!

And keep adding those pictures to the Flickr group, I'll feature more next week!!!

Friday, September 13, 2013

Operation Project $0: Day 10 mixing it up

So today as part of Operation Project $0, I want to take a look at one of the easiest ways to start getting into upcycling.  Old T-shirts.  They are one of my favorite mediums to work in, and there are always a few tucked away in a drawer somewhere for you to play with!  T-shirts can also be easily found at Goodwill and Thrift stores, and if you want to stick to 'new' but still upcycle, watch the clearance racks at Walmart, Target, and department stores where you can often find last season's T's for about $1.


Today's look is the Melanie by ModKid.  I love this pattern and the fact that you are supposed to mix fabrics in it... now I expanded from 2 fabrics to 3, and used three shirts to complete the dress.  (two XS women's shirts - yeah those never belonged to me, and one L tank top that also didn't belong to me).  Three used T's for a grand total of $0!!!


I just love these bound pockets - I mixed up the pattern a bit and had the sleeve match the side panel rather than the main fabric - I really wanted more of the teal in the look!

If you are new to working with knits there is one tool I want to recommend to you - a double needle.  Yep - a $3 double needle is the key to hemming and finishing your knit garments (unless you want to invest tons of money in a cover stitch machine - while you're at it, pick one up for me too, mmmkay!)  There are tons of other helpful tools - ranging from cheap ones like tissue paper, to medium ones like a walking foot, to expensive ones like a serger and cover stitch machine.  But seriously... add that twin needle into your mix and your world of sewing with knits will change forever!
this isn't the best picture of it, but the neckline, bottom hem, and sleeve hems are all done with a twin needle

Loving this pattern - I'll pair it with leggings for fall, but I couldn't make my baby suffer through that much clothing when it was hovering around 90 outside.  Thus the primarily close ups of her sitting - I am not a fan of flashing the diaper ;op


I hope you all have a great weekend ahead - and if you have time to sew, consider being inspired to sew along with Operation Project $0, and don't forget to link up your images to the Flickr Group so that I can feature some next week!